How the plotter converts images to Gcode
So you might know that I have a pen plotter which I built. I first made a smaller version that was not as good then in 2021 the one I have today which works great. Lately I have been plotting quite a few usernames and profile pictures of those liking a certain Mastodon, Bsky and Twitter post.
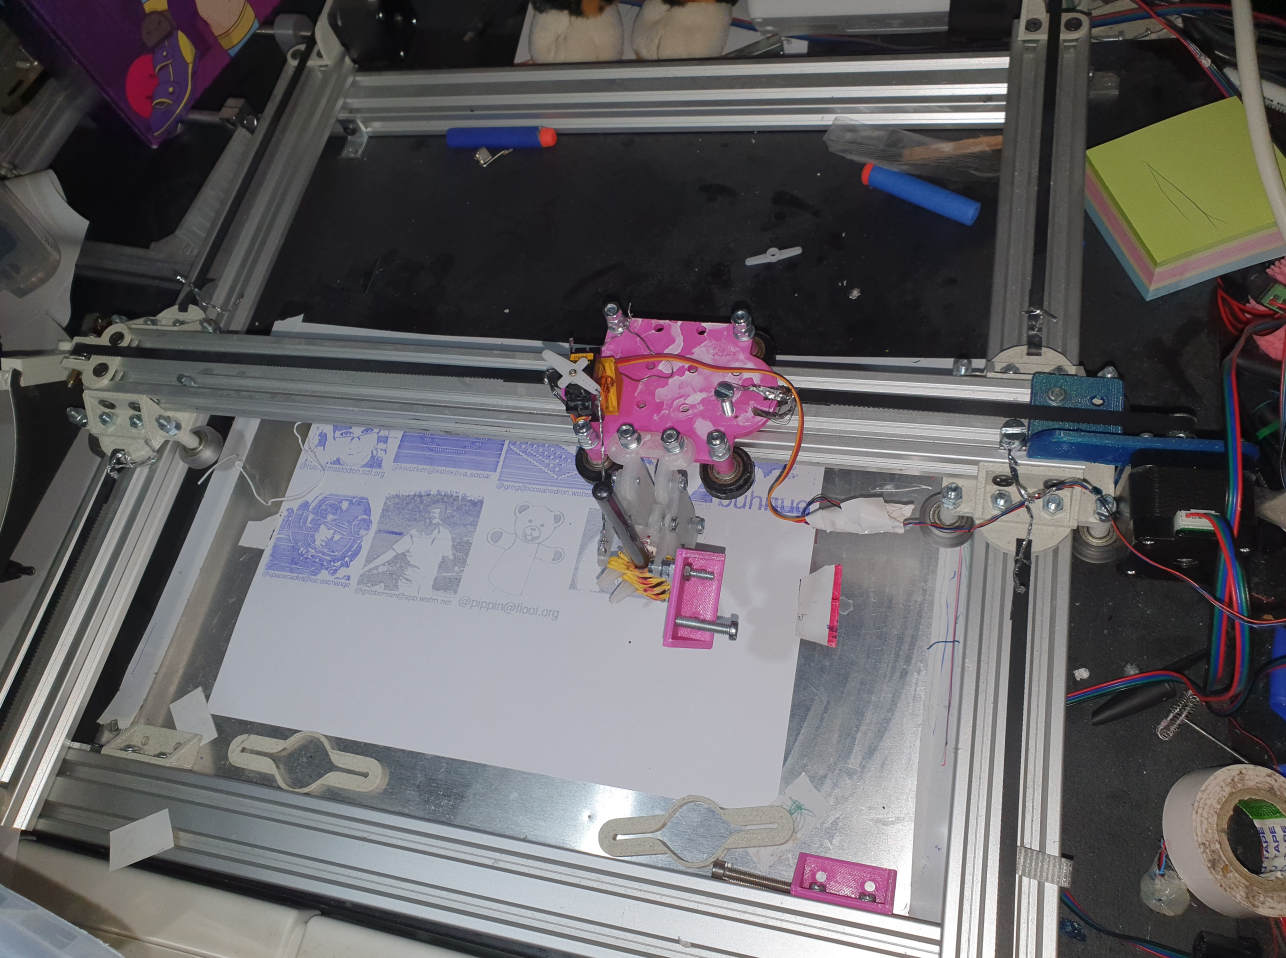
It is a very fun project to be working on as it requires both programming, electronics, 3D printing and similar knowledge. You can see how the plotter looks in the image below and it is currentonly plotting while the picture is taken.
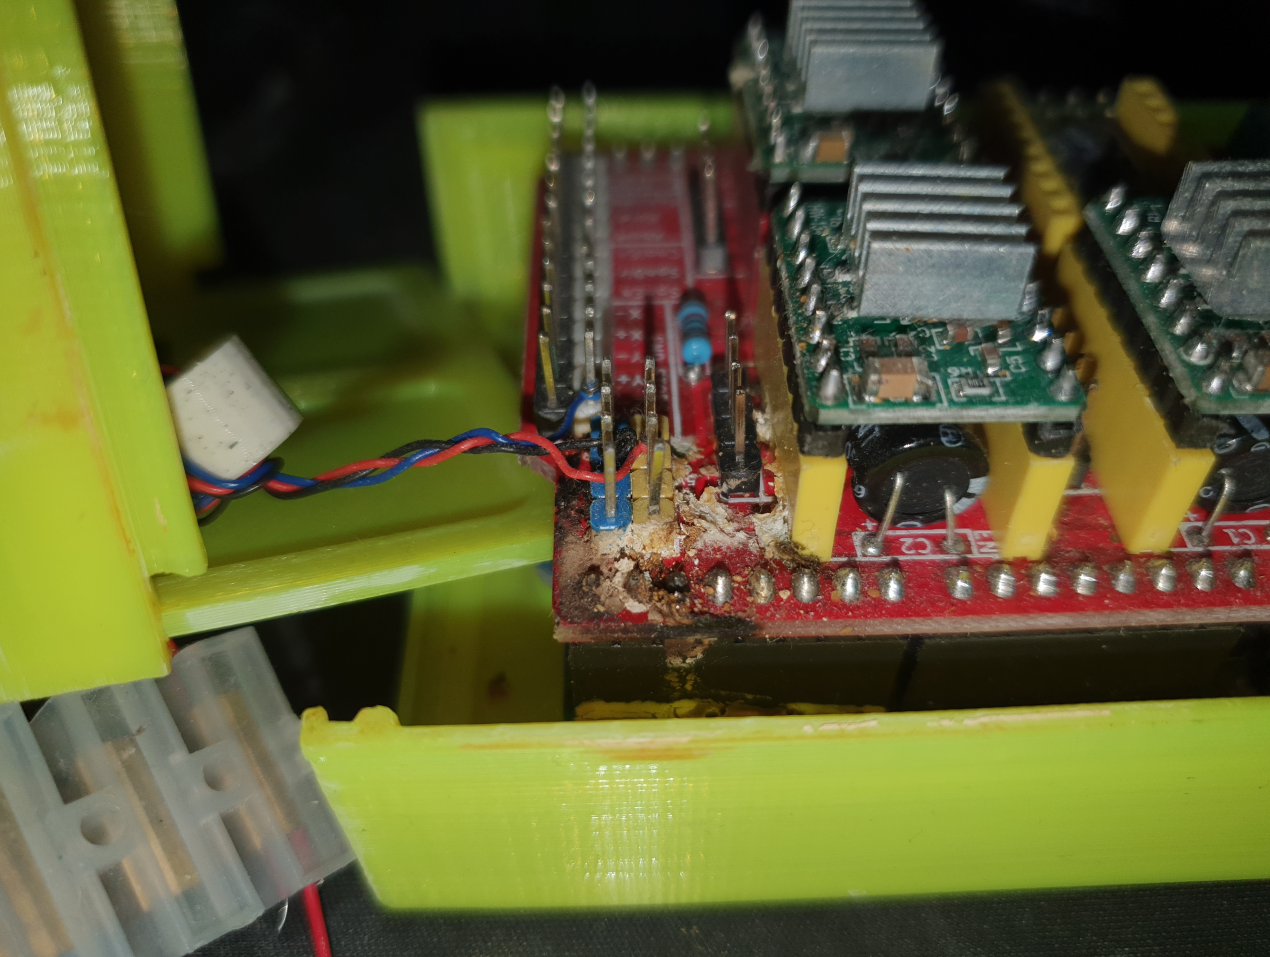
There has been quite some issues with various things related to the plotter over the years but I have been able to fix each one. Below is a picture of where the board corroded a bit which I discovered today after it stopped working but luckily I have a backup board and it should be easy to fix that board eventually.
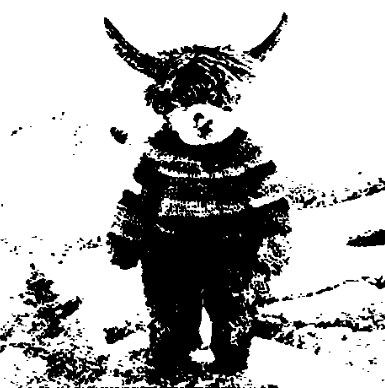
I have also had some software related issues like how to actually in the most efficient way convert an image to be plotted. To do this I have chosen a very simple method where it calculates the average brightness of the image then it takes everything that is darker than average and makes it into where it is being plotted. This has some downsides however which is that certain images become very hard to see what they actually depict which you might have seen in the image above.
There is also one thing you might have noticed if you saw the images and that is that every image is only plotted with pen strokes from left to right and nothing else. This is due to a hardware issue that is compensated in software as it counters the wobblyness of the pen with motion in only a single direction. Both this issue and other software issues is something I plan on fixing in the future tho as most plotters do not have these kinds of issues and I should redesign and print a new pen holder to fix it.
So below you can see the code used to make the entire gcode for the plot. You might notice several things like it asks the user if the current calculated contrast is ok and you can either press enter to accept or enter a new contrast to set it and get a preview which it writes to an image which you can see and see if it is acceptable. The code is quite complex and there are quite a few things in it line detecting lines to be plotted and such and that is also something that should be moved away from eventually.
makeplot.py
from PIL import Image, ImageDraw

import statistics
import argparse
import sys
import os

os.chdir(os.path.split(__file__)[0] or '.')

arg = argparse.ArgumentParser(description='Image to gcode for plotter')
arg.add_argument('-a', help='The average to use for the plot.', dest='average', type=int, default=0)
arg.add_argument('-s', help='The size.', dest='size', type=int, default=25)
arg.add_argument('-r', help='reverse', dest='reverse', action='store_true')
arg.add_argument('-n', help='noreverse', dest='reverse', action='store_false')

args = arg.parse_args()

# Config options such as line spacing which is the space between lines for the plot
rev = not args.reverse
linespacing = 0.05
siz = args.size
setavg = avg = args.average
lift = 25 # How much to lift pen
liftwait = 0.05, 0.05 # How long to wait to lower the vibration
speed = 999 # Plot speed

imgbase = r"""
img.png
""".strip()

try:
    i = Image.open(imgbase)
except:
    try:
        i = Image.open(imgbase + '.jpg')
    except:
        i = Image.open(imgbase + '.png')
i = i.convert('RGB')
print('Pic size is', i.size)
maxax = int(siz / linespacing)
print('Linespacing=%s,Size=%s,Maxax=%s' % (linespacing, siz, maxax))
# Scale
ma = max(i.size)
factor = i.size[1] / i.size[0]
xax = int(i.size[0] / ma * maxax)
yax = int(i.size[1] / ma * maxax)
print('Scaling to', xax, yax)
i = i.resize((xax, yax))
l = i.load()

isok = False
firstskip = True
if not setavg: # The average calculation
    baseavg = avg = statistics.mean(sum(l[x, y]) / 3 for x in range(i.size[0]) for y in range(i.size[1]))

while not isok:
    if setavg or firstskip:
        firstskip = False
        if setavg:
            isok = True
    else: # Average settings
        print('Average', avg)
        inp = input('Insert another contrast or press enter for ok (base %s): ' % baseavg)
        try:
            avg = int(inp)
        except:
            break
    if avg < 0:
        isrev = not rev
        avg = 0 - avg
    else:
        isrev = rev

    isize = i.size #100, 100
    o = Image.new(i.mode, isize, (255, 255, 255))
    d = ImageDraw.Draw(o)
    lo = o.load()
    size = (siz, int(siz * factor)) if factor < 1 else (int(1 / factor * siz), siz)
    print('Factor', factor) # This is width compared to height for scaling
    scai = isize[0] / i.size[0], isize[1] / i.size[1]
    scao = size[0] / i.size[0], size[1] / i.size[1]
    offs = 0, 0

    lines = []

    for y in range(i.size[1]): # For each line of the image
        linestart = None
        for x in range(i.size[0]): # For each pixel in the line so we can calculate lines
            pixel = l[x, y]
            if (sum(pixel[:3]) / 3) < avg:
                isdark = False
            else:
                isdark = True
            if isrev: isdark = not isdark
            if isdark and linestart is None:
                linestart = x
            if (not isdark or x == i.size[0] - 1) and linestart is not None: # Line creation calculations
                bline = linestart, y, x, y #, x if (x - 1 == i.size[0]) else x, y
                linestart = None
                linei = scai[0] * bline[0] + offs[0], scai[1] * bline[1] + offs[1], scai[0] * bline[2] + offs[0], scai[1] * bline[3] + offs[1]
                d.line(linei, fill=(0,0,0))
                lineo = scao[0] * bline[0], size[1] - scao[1] * bline[1], scao[0] * bline[2], size[1] - scao[1] * bline[3]
                lines.append(lineo)

    o.save('preview.png') # Write the preview so we can see what is happening

maxx = max(max(a[0], a[2]) for a in lines) # Get max x point for the square test
maxy = max(max(a[1], a[3]) for a in lines) # Get max y point for the square test
print(maxx, maxy)
gcode = [
    'M3 S%s' % lift, # Lift pen so we do not make a mess
    'G90', # Absolute positioning
    'G21', # Use milimeters
    'G0 X0 Y0 F9999', # Set to fast feed rate for the next step
    'G0 X%s Y0' % (round(maxx, 3),), # Do
    'G0 X%s Y%s' % (round(maxx, 3), round(-maxy, 3)), # a
    'G0 X0 Y%s' % (round(-maxy, 3),), # Square
    'G0 X0 Y0', # without the pen down and move back
    'G1 F%s' % speed, # Set the drawing speed
    ]

for n, line in enumerate(lines):
    lowx = round(line[0], 3), round(line[1] - maxy, 3) # Lowest x point since left to right
    highx = round(line[2], 3), round(line[3] - maxy, 3) # Highest x point
    firstp, secondp = lowx, highx
    gcode.append('G0 X%s Y%s' % firstp) # Travel to line point 1
    gcode.append('M5') # Pen down
    gcode.append('G4 P%f' % liftwait[0]) # Wait for a bit
    gcode.append('G1 X%s Y%s' % secondp) # Move while the pen is down
    gcode.append('M3') # Pen up
    gcode.append('G4 P%f' % liftwait[1]) # Wait a bit

gcode.append('G0 X%s Y0' % (round(maxx, 3) + 1,)) # Move to the upper right at the end to make plot visible

with open('picture.gcode', 'w') as f:
    f.write('\n'.join(gcode) + '\n')

print('%sx%s PX' % i.size)
print('%sx%s CM' % size) # Not sure if this is a correct value or not but print it anyway
It is quite some code to read but it works great so far even tho it absolutely needs to be improved along with the hardware.
Here is an example of a plot preview which you can basically see how it will end up when it is done plotting.
I should probably do more posts about electronics in the future as I have mostly done programming posts so far but now you know more about how my plotter works hopefully
*Mweeoops*
By ellietheyeen 3 February 2024 Permalink Tags: electronics plotter python